This post is about a project I completed a few years ago — a commission to mosaic a curved plastered wall for an outdoor shower and sauna. The client was wonderfully adventurous — by far the most daring yet! She told me, “I want something quirky and fanciful, and I want to notice something new every time I take a shower.” She even entrusted me with her personal collection of mosaic pieces, a small shoebox of interesting fragments, to incorporate into the design.
We began by creating a few tile samples in colors and patterns we thought she would love. Once everything was approved, the real work began: hundreds of handmade square and circular tiles were produced. Some of these tiles I decorated using a wax-resist technique, similar to batik textiles. The wax burns off during an extra pre-glaze firing, leaving the intricate patterns intact. After cleaning, the tiles were glazed in delicate light blues, greens, or clear glazes, giving the finished mosaic a subtle, shimmering charm.
 |
| 5x5 cm tiles |
 |
| small hearts and circles |
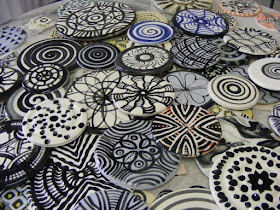 |
| Large plate sized circles, thrown on a wheel. Some were made to dry in a curved shape to fit the curved wall of the shower. |
 |
We also made many additional tiles in the same colors and patterns to fill the spaces between the circles and to be cut into smaller pieces where needed. Once all the tiles were ready, I prepared the wall with a key coat and bonding liquid and set to work on what would become a month-long mosaicing project.
The wall was set in a beautiful garden, and with the summer sun blazing, I rigged up a shade cloth to keep us cooler while we worked. My son joined me on the project, and I even paid him for his efforts—though honestly, we both enjoyed working together as a team. |
 |
| I worked from the floor upwards. |
 |
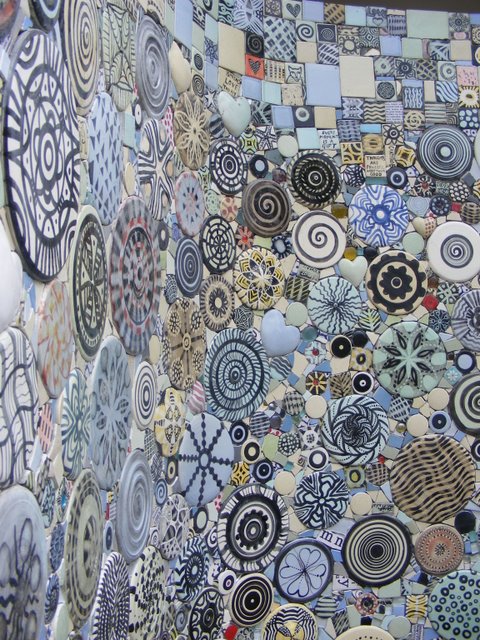
| the outside nook for sauna and shower |
 |
| details |
 |
| details |
 |
| signed MN |


Brilliant work! I found your site by stumbling and hope you are still actively checking this blog. So many questions. As a beginning ceramics student, how did you glaze fire all of the small pieces? How did they not stick to the kiln shelves? What cone did you fire your bisque and glaze firings? I appreciate all of your answers! So thrilled to see your work. Debbie Graham
ReplyDeleteIt was lots of work. After cleaning off any remnants of wax after the bisque, we laid out all the tiles on a metal grid and spray glazed them. previously I would do it all by hand, but this project was done with the Knysna Pottery House, South Africa . They since sold the business and are in California now. The pieces dont stick to the shelves as they have no glazing underneath. We fired earthenware to around 1150deg c for glazing and 1000degC for bisque.
DeleteI have been working on a new website:
ReplyDeletewww.ceramicsandmosaics.co.za and that is why I have been a bit quiet. Please have a look at it. All my new blog posts will be published there also, but the website also has super photo galleries of all my tile ranges, mosaic inserts and pottery etc.
To stop your small pieces sticking to the kiln shelves, you have to wipe any glaze off on their under surface, before firing them. We fire to about 1120deg Celcius, as we use white earthenware clay.
thank you for your answer. A few more questions please. Do you lay every mosaic piece on the kiln shelf flat or on stilts? Your amazing black and white tiles-you have stated that you use wax resist. I have never done this. Does this still involve just two firings--the underglaze over wax, then clean off tiles and fire second time with clear glaze? And finally-for the moment :)-do you use clear gloss glaze vs. matt as a personal preferance? I checked out your new blog and bookmarked it! Love your work! Debbie Graham
ReplyDeleteThanks Debbie. They were laid flat in the kiln. yes it actually involves 3 firings. 2 bisque and one glazing. we used a glossy glaze, mostly. the 2nd bisque is to burn off the wax before glazing
DeleteWe place every piece flat on a shelf. we have these mini- tile stacking shelves, which we put in the kiln and we use those to use the kiln space efficiently.. To apply wax decorations- apply wax to the bisked tile( already fired once to about 1000 deg C) Then after the wax, the underglaze colors go on, then another firing to 1000deg C. Clean up pieces and then do glaze firing. Lots of hard work, but still worth it, I think
ReplyDeletewonderful work and thanks for all your helpful tips
ReplyDeleteOMG. I am sitting here at work with my mouth open. This literally took my breath away. Would love to see this in person - this is totally amazing.
ReplyDeleteThis is an astounding piece of work! Lucky owner! I love your work- have seen it in the studio. You have a wonderful energy and whimsical tone. Keep up the wonderful work!
ReplyDeleteRegards Jenni
Thanks Jenni!
Deletethis is gorgeous and inspiring ;)
ReplyDeleteThank you. xx
ReplyDeleteWhat bonding liquid do you use? can mastic be used? trying to lighten the weight, and not use mortar. is there anythin g else I can use that will withstand the weather outside? this is for a 3D sculpture. therefor cement backer board wont work
ReplyDeleteWhat bonding liquid do you use? can mastic be used? trying to lighten the weight, and not use mortar. is there anythin g else I can use that will withstand the weather outside? this is for a 3D sculpture. therefor cement backer board wont work
ReplyDeleteI dont know what mastic is. I buy tile bonding liquid and apply to all surfaces. as for making the weight lighter.... mosaics are heavy and if the base is not strong and solid, it wont last. especially if it is a sculpture and will be outside. So dont doom the mosaic to failure before it has begun. I have done outdoor 3d mosaics and I used polystyrene as the base. I sanded and shaped it, then applied a white cement layer using bandages as well. So far it has lasted a few years. It took so long to prepare the shape for mosaicing that I never tried that again. Lots of stages and in between drying times.
Deleteso yes it is possible but requires lots of extra preparation and drying time inbetween the stages.
DeleteI think the curved pieces give it a more professional look. The fact that you can hardly notice them makes it worth it. Beautiful piece. I love outdoor mosaics!
ReplyDeleteI think the curved pieces were worth it and make it look more professional. The fact that you don't notice them makes me think that your eye would have gone straight to them if they were flat. Beautiful work. I love outdoor mosaics!
ReplyDeleteThis comment has been removed by a blog administrator.
ReplyDelete