25 January 2011

Mosaic inserts for mirror frames and picture mosaics

Mosaic inserts are ceramic shapes that can be used as focal points on mosaics and is quite an easy way for beginners to start mosaicing. .

Below is a picture of a  mosaic framed mirror I did for  a client in Hout Bay, Cape Town using the inserts. I sent them the mosaic frame on the board, and they installed it to site, including the mirror. It may be under cover but it is still outdoors- so it must be able to withstand rain splashes,  and temperature changes over the seasons. If you want to know how to mosaic like this (its very easy- just time consuming)- see posts on this topic elsewhere on this blog.
Fishy mosaic mirror for outdoor area

My happy customer reflected in the mirror


Here are some photos of just a few of our mosaic inserts we have available at the Pottery house. So if you are a mosaic artist, driving on the National Road between Knysna and Plettenberg Bay, you HAVE to stop by and visit our studio and showroom. If you are a bargain hunter- you will be in heaven. Scratch around in the seconds box for really, really inexpensive things. We are just off the N2, on the eastern side of Knysna. Turn into Bokmakierie St, and we are right there. You cant miss the mermaid waving at you. .

small butterfly mosaic insert

mosaic inserts for sale at pottery house


stripey fish mosaic inserts approx 15cm

cats and chameleon handpainted ceramic mosaic inserts

little piggies, mosaic inserts

funny angels, mosaic inserts. I have improved these since
tree of life mosaic 

Mosaic mirrors 

ceramic tiles and things we make at Knysna Pottery House

mosaic inserts, handmade with love

Entrance to Knysna Pottery House

12 January 2011

How to mosaic - Grouting (Part Three)

Once your pieces are glued down properly- and not able to be moved at all, you can begin grouting.
Make sure the mosaic is clean- no loose bits anywhere.
Mix the grout according to the instructions on the bag it came in. I add some bonding liquid- about 25ml to 250ml of water. This makes the grout waterproof and stronger-  and you can also experiment with water based paint  and pigments to tint the grout (if you want color). Finally, add the grout powder- usually it is about 3 parts powder to one part water. I just go by feel now- it is fairly forgiving stuff. Just make sure your mixture is firm and gelled before using. Definitely not sloppy and runny, or dry and crumbly. Add more water or more powder until consistency is correct and leave to stand for 15 mins before using.


Then get a sponge or spatula and just blob and smear it all over the mosaic. Wipe it into all the grooves.
Do NOT try and clean it too soon. BE PATIENT!!  Wait 15 to 20 minutes and then clean off the excess grout with a DAMP sponge, not dripping. Try not to re-wet the grout. Don't go crazy cleaning at this stage. Leave it for another 15 minutes. At this stage one is kind of desperate to see the finished results so ALL beginners clean the grout off too soon. Then you end up with valleys or as I call them "dongas" between your pieces where dirt will collect and make your mosaic look grubby very quickly. If this does happen- you can re grout and enjoy the process all over again.  Once the grout is level with all your mosaic pieces and dry, you can give it a final polish with a dry cloth and step back and admire your artwork.
If you have used  ready mixed adhesive (not the cementy kind) you can use acetone to clean any remnants off the surface.

08 January 2011

How to Mosaic (Part TWO)

                                                           a forest themed mosaic framed mirror
                                                             an easy project for beginners


PART TWO: How to Mosaic for beginners

1)      Prepare your surface:
      Sandpaper and apply bonding liquid onto your surface and allow it to
      dry.
2)  Choose your design and colors.
Make a pencil sketch on your surface if you can. When planning your composition- try and imagine it in the mind’s eye. Perhaps the focal point should be slightly off centre? Try and make sure your colors are balanced and complimentary.  Don’t give yourself any difficult shapes to fill. Start with flowing lines, rather than an intricate pattern. For example, an underwater scene can have a flowing wavy background, with fish inserts swimming through it. Draw the pencil lines, place the fish over them, here and there, and then position the small broken glass tiles down, as the background, using the penciled wavy lines as a guide.  Do an entire wavy line in one color and then change color for the next one above. Use glass drops or a different texture, or a row of broken mirror pieces. The fish are swimming over the wavy lines. When doing the background of a tree mosaic, the wavy lines would be distant hills. They don’t flow around branches, so make sure the background doesn't get too confused with the foreground, unless you want it to.

Note that I haven’t started using adhesive yet.  I only start sticking the pieces down when I am happy with the design and colors. When trying to visualize the end product, remember that the grouting process changes the mosaic considerably- it  pulls the design together.

3) Cutting Glass, Mirror, & Ceramic tiles:
Use glass mosaic cutters. They have two round blades that you squeeze together and they snap the piece in half with ease. Practice using them by cutting lots of squares, rectangles and some triangles. If you limit yourself to these shapes it will go quicker (and you will develop a similar style to mine.) As you place a piece down- look at the space you leave behind. Are you leaving yourself a big angled confusion or an easy shape? Sometimes just trimming a corner off makes your next piece easier to place.

4) Placing your pieces down
Place your pieces onto your design, and trim off the bits that are “in the way”, i.e. hold your piece over the place where you want it to go, and trim off the corner that is in the way. My rule is that pieces should be close together, but not touching. Grout is important and adds strength to the mosaic. Later, when everything is glued down and dry, the grout must be able to surround each mosaic piece. I sometimes take it a step further and grind down the sharp edges on the glazed ceramic pieces, or mirror, as they can be horribly sharp.


5)Now Just Get On with it
Tile adhesive- in South Africa we have the pasty, ready mixed white glue in a 1kg bucket, or mosaic adhesive (white cement) or grey powdery tile adhesive that you add water to. I usually use the ready mixed ones, but still use the old fashioned tile adhesive if working onto a concrete surface, like a water feature, birdbath, umbrella stand or shower floor. I always add bonding liquid to it to make it waterproof and stronger as well. Follow the instructions on the container, even if you need to get your reading glasses! 

Now that you have your design, and your pieces, you just have to start on one side and work methodically to the other side. If you have an assistant at this stage, it really helps. Artist positions the pieces, helper glues down. Use a stick or spatula of sorts to apply just enough glue to the back of the piece. You don’t want adhesive squishing out messily from under the piece as that will mean cleaning later to prepare for the grout. Not too little either. It must cover the back of the piece and be pressed down firmly.  You will have a little while to adjust its position before it sets. If there is old adhesive or a scrap of broken tile under your piece, it will stick up above the other pieces and look  and feel wrong, so make sure it is a clean flat surface you are sticking your piece onto. 
You can get away with applying the glue to the surface in one long strip and then applying your pieces, but first do it the hard way, until you are accustomed to the glue you are using and its drying time etc.
Have a damp sponge handy and clean your hands and then the mosaic, gently. Some glues are hell to clean afterwards when they are dry, so try not to be too messy and use a matchstick or whatever, to clean off excess adhesive from between the pieces as you go.

Once you are satisfied you have glued everything down, clean it one more time and leave it to dry for 12 hours or so.

The next stage will be the grouting stage.


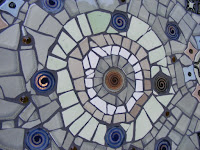
The picture below shows the glass mosaic cutters. This commission was for an abstract theme with circles, mosaic framed mirror in fynbos tones


07 January 2011

How to make an Original and long lasting Mosaic PART ONE


There are so many styles of mosaicing, and with some research on the internet, you will soon see what does, and does not appeal to you. There is no point in laboring over a mosaic creation, only to detest it on completion and hide it away in the cellar or garden. I don’t like seeing mosaic creations that are falling to pieces and rotting either. A good mosaic should last for a long time. An outdoor mosaic needs to be made properly to withstand temperature changes and weather.
Most of my very first mosaics creations have been recycled or hidden away, so why not skip this expensive learning curve and learn the correct methods? On the various internet mosaicing social networks, I come across names of materials I have never heard of, like “thinset”. In South Africa, we don’t have the same choices but manage well with the basics and some good products made by one or two companies.
My Golden Rules for beginners:
1)      Do not mosaic using a timber substrate, especially if the piece will be exposed to fluctuating temperatures. Timber expands and contracts and eventually the mosaic will fall apart. If the mosaic is going to stay indoors at a constant temperature it should be OK.
2)      Paint a priming agent or bonding liquid on surfaces before mosaicing on to them, and make sure you are glue-ing your piece onto a really sound, clean and firm surface.
3)      Buy some glass mosaic cutters. All mosaic artists should have some of these. 
4)      Start small. Remember, “Less is more”. Contrast your background and foreground colors or else the detail is lost.
5)      BE PATIENT! Drying time is important. No rushing- you just end up having to re grout the whole thing if you rush. Aim to get your grout level with the surface of your pieces
6)      Be Safe: Glass and glazed ceramic pieces are sharp. Wear goggles and gloves. Adhesives and grout are hard on nails and skin. Take precautions. Wear shoes in the work room and be careful of your elbows too. 
Materials required:
Water, Adhesive, grout, bonding liquid, buckets, sponges, spatulas, glass mosaic cutters and tile nippers. 
Collect or buy:
Tesserae: pebbles, shells, hardwood, ostrich shells, sea shells, glass, broken ceramic things
Ceramic or glass tiles, glass nuggets, ceramic or glass buttons,  ceramic or large glass beads, (semi precious stones can also be used if flat enough)
Earthmaid Mosaic inserts from Knysna Pottery House  www.knysnapotteryhouse.co.za 

A Surface:
Mirror frames, walls, floors, big stones, umbrella stands, fireplace surrounds, planters, an old bath in the garden, an entrance hall a path, a big paving slab, a birdbath, a fibre cement board


tree of life detail- before grouting. This mosaic, a  large wall panel, got lost by couriers on it's way to Texas, USA,  but was found, slightly damaged after 3 weeks. They refunded the transport cost, which was almost twice the cost of the mosaic. It was repaired and installed at the clients swimming pool - so a happy ending...


 I sold this at a craft fair.
 mosaic inserts around a mirror
 handmade from real leaf imprints from our jungly Knysna Pottery House garden
 she sells sea shells on the sea shore - we have big ones and small ones
To be continued…. 
Part Two...

05 January 2011

mosaic table- slow progress Stage Three


This third stage is taking forever. The drilling of the holes was messy and time consuming and I am not sure that the end result is worth all the effort. The glass discs were thinner than the ceramic pieces so had to install them carefully with extra silicone.


So at last the design is set, and it is just a matter of gluing the pieces down and filling in the backround with plain glazes in soft complementary colours. Hopefully the next posting will show the table just before grouting. It is taking especially long because each cut piece of tile has to have its edges ground down on a grinding stone.


There is a lot of dust and dirt on the table, so have to clean the surface with a brush first. I tried vacuuming the dust off but my vacuum cleaner sucked some of the pieces up and made funny noises, so I thought better just use the paintbrush...... My hands are aching a bit too, so giving them a rest. I discovered I could make my vacuum cleaner blow the dust off, which was better than sucking the dust up... A few smaller pieces went flying off.....

17: 01/2011 update: I have been very lazy and taking far too long to finish the table, but I made good progress today. I am almost finished glue-ing all the pieces down. I am planning the grouting already. I think dark grout will look great.  I will do the final post on this table project this week. Promise.

02 January 2011

Making a mosaic table top Stage 3 and a 1/4

Here is my husband Bruce drilling some holes through the table so that light will shine through the glass drops. The fibre cement board absolutely killed his drill bits so I said I would buy him new ones when I sell this table.
Here is the small hole with the glass drop that will go over it
inside design still a work in progress. Amber glass drops glued down with clear silicone
Posted by Picasa

01 January 2011

Table top in progress, stage 2


 working out the design, sometimes takes longer than the actual glueing down part. This is about my 3rd
attempt to design the top.  Keep bumping the edge tiles as well and they need to be strongly glued to the table, so I will walk away for now, while they dry.


this is my husband working on edge tiles for me. New years day- his first day off for a while. shame.

Starting A Mosaic Table top

Starting a Mosaic table top- things I will use: 

The base is made of galvanised hand made metal
The top is made of 20mm thick Fibre cement board, waterproofed/ painted underneath, and primed for tiles on top with keying agent or bonding liquid.
Before painting and priming I used a rasp to round off the edges and then sanded them, so that the edge tiles fitted better.
You can use a pencil to sketch outlines on to the table- the bonding liquid is clear and wont hide them.

Handmade ceramic edge tiles go on first
Posted by Picasa