12 March 2012

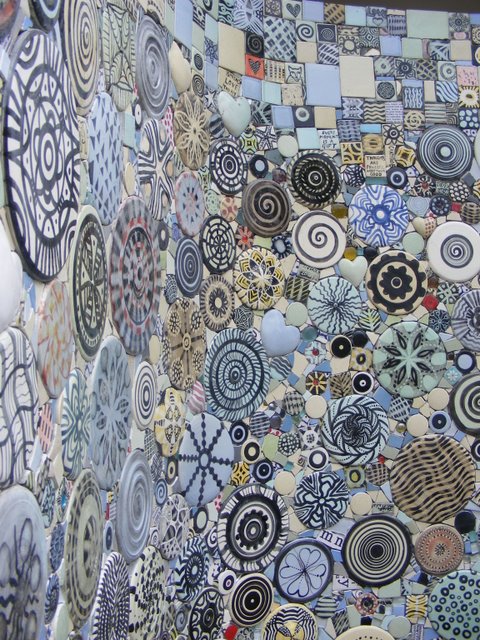
Outdoor shower mosaic on a curved wall.

This post is about a project I completed a few years ago — a commission to mosaic a curved plastered wall for an outdoor shower and sauna. The client was wonderfully adventurous — by far the most daring yet! She told me, “I want something quirky and fanciful, and I want to notice something new every time I take a shower.” She even entrusted me with her personal collection of mosaic pieces, a small shoebox of interesting fragments, to incorporate into the design.

We began by creating a few tile samples in colors and patterns we thought she would love. Once everything was approved, the real work began: hundreds of handmade square and circular tiles were produced. Some of these tiles I decorated using a wax-resist technique, similar to batik textiles. The wax burns off during an extra pre-glaze firing, leaving the intricate patterns intact. After cleaning, the tiles were glazed in delicate light blues, greens, or clear glazes, giving the finished mosaic a subtle, shimmering charm.


5x5 cm tiles

small hearts and circles

Large plate sized circles, thrown on a wheel. Some were made to dry in a curved shape to fit the curved wall of the shower.

We also made many additional tiles in the same colors and patterns to fill the spaces between the circles and to be cut into smaller pieces where needed. Once all the tiles were ready, I prepared the wall with a key coat and bonding liquid and set to work on what would become a month-long mosaicing project.

The wall was set in a beautiful garden, and with the summer sun blazing, I rigged up a shade cloth to keep us cooler while we worked. My son joined me on the project, and I even paid him for his efforts—though honestly, we both enjoyed working together as a team.


I worked from the floor upwards.

the outside nook for sauna and shower

details

details

signed MN


As you can see, it was quite a task and kept me very busy for days and days.

The curved wall and circles create quite an illusion of flatness.

My son Julian has the honor of sticking down the last piece.

exhausted and dirty, but happy, finished grouting

I can hardly notice the curved circles on the curved section of the shower wall. Was it worth it?


26 February 2012

How to Mosaic a Garden Pot

I love a FREE materials project.  Or just one that hardly costs anything.


Upcycling Fun: A Free-Materials Mosaic Planter

I absolutely love a free or almost-free materials project! There’s something so satisfying about creating beauty from what others might call “junk.” For this project, here’s what I used:

Ingredients:

  1. An old cement planter, generously given to me by my mom.

  2. Key coat/bonding liquid to prep the surface of the pot.

  3. Cement-based adhesive for sticking tiles and plate pieces.

  4. Some old plates—also donated by my incredibly talented mom. These 15-year-old beauties were slightly crazed and chipped from years of use (dishwashers aren’t kind to earthenware!).

  5. Used white glass tiles, kindly donated by my friend Sandy.

  6. A few mosaic inserts I had lying around.

  7. Some old tiles salvaged from a 12-year-old mosaic project on wood (a cautionary tale—mosaics on wood rarely last, so don’t make that mistake!).


Method

I started by carefully breaking the plates into quarters using a glass mosaic cutter, then into smaller pieces. Keep the puzzle together as much as possible—you don’t want to mix up the pieces!

At first, I tried smearing adhesive directly onto the pot and then sticking the pieces on. It was messy. For the next batch, I applied adhesive to the back of each tile or plate fragment—much tidier and far easier to control.

The pot sat on a large turntable (lazy Susan), which makes mosaicing large objects so much easier. I highly recommend one—it’s essential for working comfortably on all sides. Covering the entire pot took a full day, working until the sun set and the mosquitoes came out to remind me of my outdoor status.


Grouting

Thanks to the turntable, grouting was far less of a back-breaking chore. There was even a little helper: a black-and-yellow wasp had made a nest underneath. He buzzed in and out while I worked, and we carefully respected each other’s space.

I added a touch of bonding liquid to the grout water for extra adhesion and got busy smearing it into all the gaps. Grouting is definitely messy work, but an important tip is to turn the pot upside down before finishing to fill in the gaps under the bottom edge tiles. I also cushioned the pot with an old dog blanket on the turntable to protect the edges—especially the delicate plate fragments.

The result? A quirky, upcycled mosaic planter full of charm, color, and memories.
 

A mosaic is only as strong as its weakest piece.


When the grout was dry, I used my Dremel tool to grind down the sharp edges on the plate. The plate has thicker parts and a curved edge, so it was impossible to get it totally flat. But I just made it work, knowing the grout and my Dremel tool would sort out the irregular and sharp bits.


11 January 2012

Ceramic Letters for Shop Fronts and How to Mosaic an Umbrella Stand

22cm tall letters in free font "off the drugs"
This was supplied to Baviaans tourism for their craft shop sign. The local crafters were going to complete it themselves. The sign was 4m long and about 35cm wide

Ruth's mosaic, using some of my fish and dolphin designs, in stock at the Knysna Pottery House
 Prepare the concrete umbrella stand with bonding liquid. Use the powder tile adhesive with some bonding liquid mixed into it- not the ready mixed kind

The completed umbrella stand
Grout with light grey grout, not white- which will get dirty and look grubby in no time.

Fish Mosaic Platter


The Knysna Pottery House is really a wonderful treasure house of ceramic things.  I needed a quick project  just to get into the swing of things. (And as usual, I am doing a new post about it, before the project is completed. So you might have to come back to this blog later to see the picture of the finished project. Just knowing that I need to update the blog with the completed project, makes me a little more inspired to get on with the job.)

Ruth and Craig Renwick are the two people who should get lots of credit for the Knysna Pottery House- (facebook page) an amazing, work from home, studio arrangement. They are always willing to help but are sometimes short staffed, so you might have to be a bit patient, and be prepared to look into the scratch patch and reject bin for inspiration.  Ruth showed me a ceramic platter, that was glazed underneath only. The top surface all ready for mosaicing.  Perfect!
I chose 3 of my fish tile inserts that the pottery house always has stock of and went home.

I found a box of my glass tile scraps and mirror pieces and started playing around with composition ideas. First, the fish needed to be broken in 3 places to fit the gentle curve of the platter. Otherwise there would have been a weak spot under them. Once I knew I had enough of the colours I wanted, I removed everything off the platter and prepared the surface by applying a coat of bonding liquid to it.

I started sticking down the pieces using the flexible ready mix  white tile glue

I got bored and wrote this blog, and now I have to finish this project.
Fish Mosaic platter in progress


Finished.

15 October 2011

Finishing the Leafy Mosaic Table Top

finished.


wow, it looks so bright and lovely at night!
The grouting is done and now so am I.
goodnight

02 October 2011

Leafy Mosaic table top, second stage

I used clear silicone to glue glass drops and ceramic pieces onto the glass centre. I will use black grout to fill the spaces in-between the glass drops.
I re-arranged the leaves. Tomorrow I can start glueing the pieces down. The edge tiles should be coming out the kiln now.
the black grout will change the effect a lot. be prepared for that.
A lantern hanging under the table, or a sunbeam will illuminate the centre of the table.
all ready to start sanding sharp edges and then sticking them down. This is the boring and slow part. I only manage small sections at a time. But doing things properly now saves a lot of hassle later.

Lots of work to do, and I am IMPatient, I dont want to wait any longer, I want to  finish this in time for the Leisure Isle crafts festival in 2 weeks time (I think)
Knysna Loerie Mosaic insert
details
the edge tiles are on, and the filling in begins.


21 September 2011

Leafy Mosaic table top project - first steps

The 18mm thick Fibre cement Nutec surface is primed with bonding liquid/ key coat. Just waiting for the edge tiles and a few more inserts for the middle. These will match the 4 chairs, which have mosaic seats in the same theme and colours. I will add more posts as I make progress


the leafy inserts and mosaic pieces are laid out on prepared substrate

the centre of the table will have glass mosaic inserts applied with clear silicone

10 September 2011

More mosaic seats


Here are a few more pictures of mosaic seats I am busy making.
Among all of these chairs, there are 4 that will belong to a set, with a matching table top.
The ceramic inserts (leaves, birds, flowers) and edge tiles are being fired and glazed in greens and complimentary hints of cream and amber etc and I am looking forward to getting started, and having a matching set! (instead of all the crazy colour combos I seem to do)


outdoor mosaic studio


starting a new seat
before grouting


"Jeremiah was a bullfrog..." Mosaic seat on a wrought iron chair.
part of a set of 4 chairs and table
organised chaos

I am also making a table top for the four greenish mosaic seats, so it will be a matching set. As the centre of the table has to be cut out for the glass section, I had a nice round board. I used some lime green fish and shell inserts- old stock, mirror pieces and deep red mosaic tiles made at Knysna Pottery House to make this mirror. Not everyone's 'cup of tea'. A visitor to the shop this morning said it was "gaudy". Oh well, I get tired of blues sometimes and enjoy a shocking colour combo occasionally..
Lime and deep orange fishy mosaic
mirror