 |
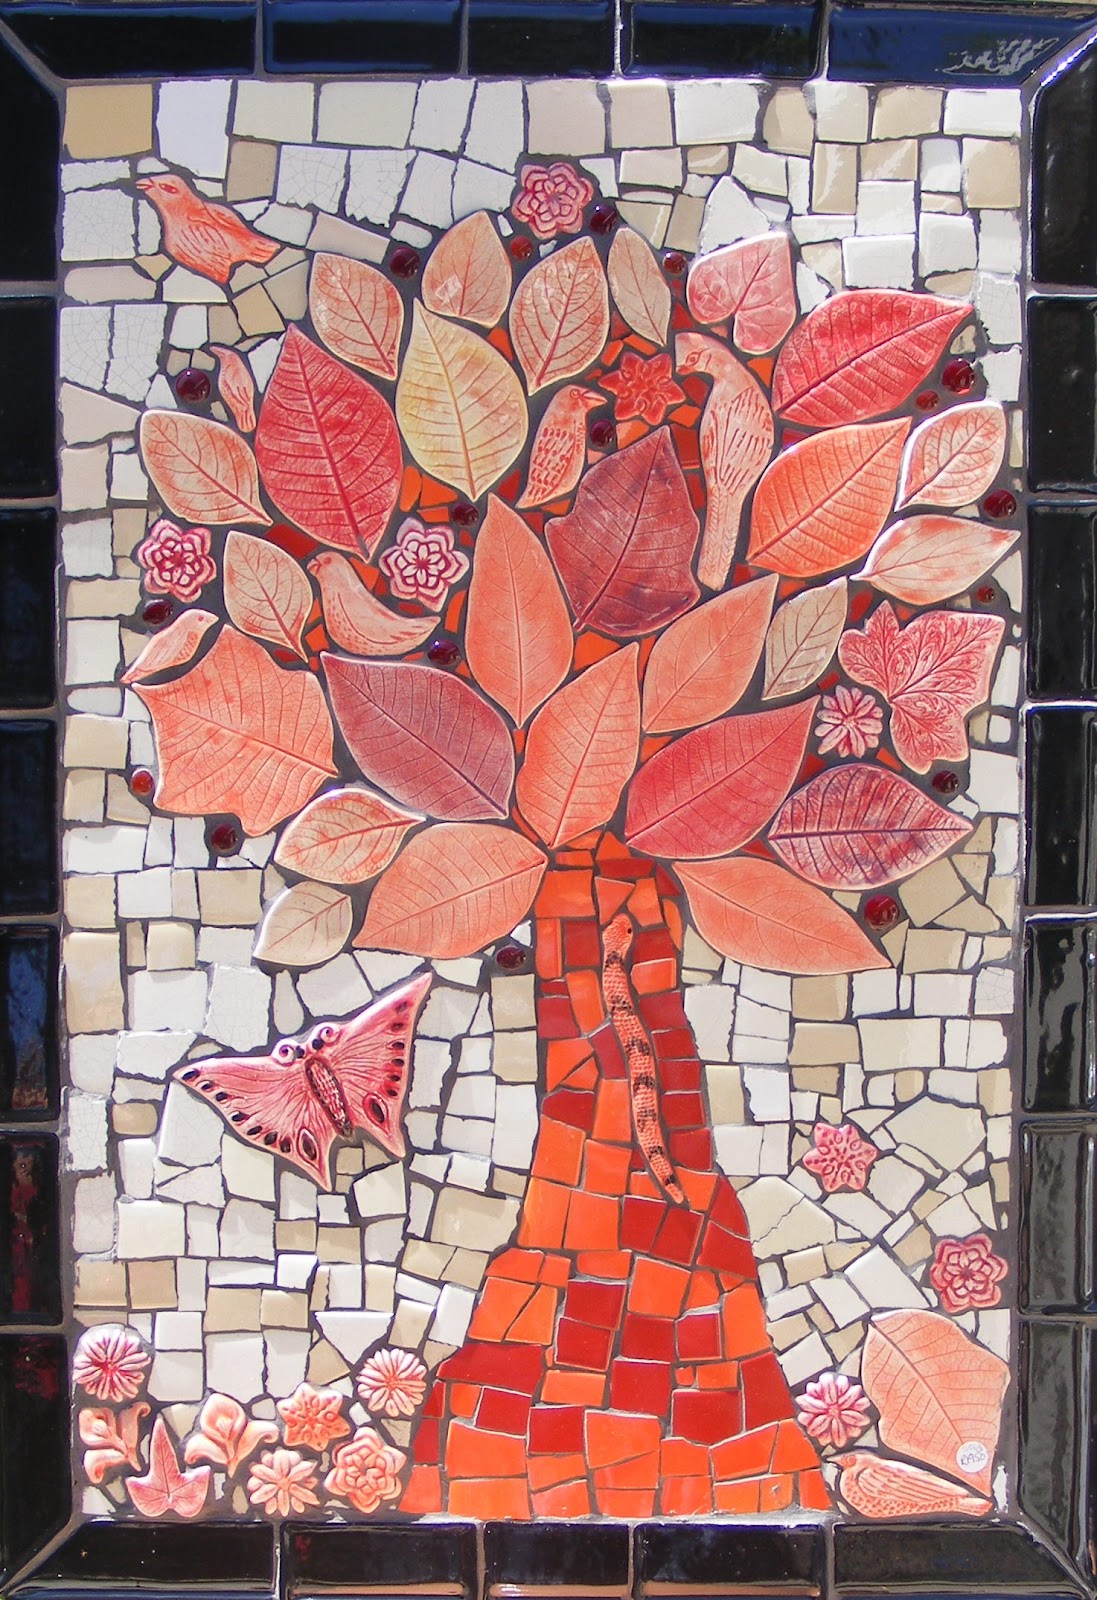
| Butterflies, leaves and birds, flowers, a snake, broken ceramic tile, glass drops. |
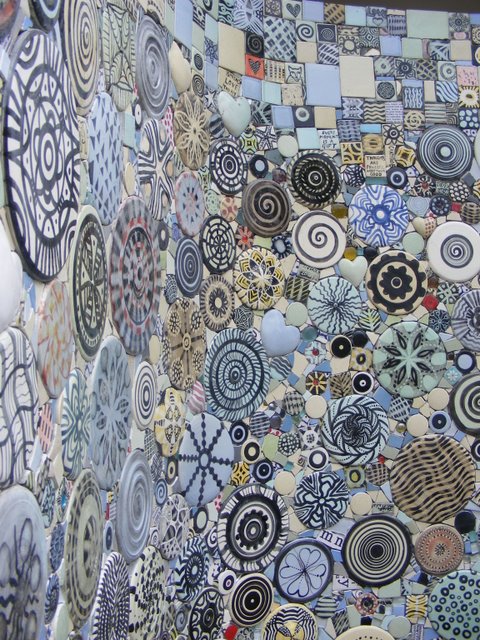
I often get enquiries on the actual making of the mosaic inserts. here is an excerpt from a lovely email I received a few days ago, and my reply:
Hello, Marylou!
You don't know me, but I've been browsing your earthmaid blog website and dreaming about your wonderful work! I especially love your mosaic inserts! I've seen many mosaic projects, and liked them, but your mosaic insert designs are what most captured my attention. After browsing your website, I went on a hunt to find inserts like yours -- I thought I would begin collecting tiles for a future project. However, I soon discovered that your tiles are one-of-a-kind! I couldn't find anything like them anywhere - either locally or even on-line. As a teacher, I recently relocated to a middle school. I'm excited because now I can explore many more art techniques and media with my older students.
Your work has inspired me to learn more about working with clay. I have done many different art forms, including some basic mosaic designs with stained glass, but haven't done ceramic work -- yet! On your blog, you describe how to do mosaics, which is wonderful! However, I am most interested in learning more about how you create the tiles themselves -- the techniques you use to create the designs on the tiles. I'd love to try making some inserts for my personal use for mosaics --and I'm also imagining that they'd make wonderful pendants, too. I suppose that using polymer clay for pendants would work, but I would like to explore working with clay -- I wonder if my students could try the technique you use to make small projects, or if it would be too difficult. Would you be willing to tell me more about how you make your inserts, and the techniques you use, or point me in the right direction to find information via the internet or an excellent book resource? I am interested in purchasing some of your inserts, but I can well imagine that if I wanted to get enough for a mosaic project like the mosaic table you feature on your blog site, it would cost me a small fortune to get them to Canada! If you do sell them, I'd like information on how I could order them, and the cost to purchase and ship them to Canada. Thank you so much for sharing your work through your blog, and I hope to hear from you soon!
I replied:
Thanks for the email and kind words.
If your school has it's own kiln and pottery equipment then making your own inserts will be a fun thing to do.
I would suggest you start by getting a slab of clay rolled out- about 6mm thick, either on a slab roller or by using a rolling pin and 2 dowels.. Get a book from the library on handmade tiles to see how to make a slab.
Then when it has firmed a bit, press cookie cutters into the clay. Or press leaves, veins down into the clay. Cut with sharp tip knife around leaves. Or use paper template and a knife to cut out animal shapes, hearts whatever. Remove in between bits leaving the shapes on a wooden board (or bat- as they are called in pottery studios) to dry overnight.
The next day they should be firm enough for you to pick up and clean off edges.
Then when they are dry, decorate and fire in kiln.
I paint on the underglaze, and then scratch through it to make designs- scraffitto
I use plaster of paris to make moulds of the inserts I make, and that is another long process- but if I was teaching a class to kids- I would use the slab method.
Regards and hope you have fun
In addition to the info in this reply, I will add these extra "pearls of wisdom".
There are many good "how to make tiles" books at the local library. Tutorials with step by step pictures will be helpful.
1) Try and make sure your clay slab has no air bubbles in it.
2) Do not handle the shapes cut from the clay slab while the clay is wet and floppy
3) Put a layer of newspaper over the clay shapes,and then a board, with a weight on top of the board
so your shapes will dry flat.
4) Sponge off the edges with a damp sponge, when the clay is leather hard, or dry
5) To slow clay slabs from drying too fast, cover unfinished projects with clear plastic- An old fridge is a good store for incomplete clay projects.
You can experiment with decoration techniques. Wax resist, scraffitto and simple one colour effects are best for beginners and children. The results always look better, than a mish mash of colours. Keep it simple. Also try those little rubber stamps which can be pressed into clay slabs- just wait for the clay to be the right hardness- not too wet and not too dry and then let the children and their imaginations go wild. They must remain well behaved and supervised as sharp objects are required to cut around the shapes, impressions. Remove in between bits for clay re-cycling.
Once the impressions and shapes are cleaned off and dry- decorate with underglazes. Apply, dry, rub off the underglazes and the colour stays behind in the stamped impressions. Very easy. Bisque fire (to 1000degreesCelcius), and then follow that with a glaze firing either using translucent glaze (or none at all. if you want a matte look)
Pottery is an extensive subject. Even if you have been doing pottery your whole life, you can learn something new about clay, glazes, firing and decorating every day. This blog is more about mosaic techniques and ideas, but I am glad I have written this post- for those brave people who want to try and make their own mosaic inserts.
PS: If my blog has helped you with ideas information or inspiration, please re-pay the favour by sharing my earthmaid blogspot with your friends and family. One of these days I am going to try and get sponsorship and every 'view' helps. Please add comments too. Thanks XXX